I am building the basic foundation for a B2C web application, using ASP.Net Core 2 and Cosmos DB. Along the way I’m going to need authentication, source control, CI/CD, … but first I have to start learning what’s changed in ASP.Net Core 2 and how to use Cosmos DB beyond the 5-minute console application demo. There aren’t a lot of ASP.net Core 2 and Cosmos DB blog posts out there, so I thought we could do this together and hopefully my experiments and errors will help you get there faster.
I’m in the writers chair, though, so this will be somewhat opinionated. We’ll be ignoring some pre-packaged solutions (like ASP.Net Identity, Entity Framework, Bootstrap), shipping in small increments, and aiming for a balance between YAGNI and a clean foundation.

Who is this for? If you have worked with earlier versions of ASP.Net Core and need a hand starting with Core 2, wanted to try out Cosmos DB, wondered how to create Custom Authentication without the clumsy abstraction of Identity model, worked in other ASP.Net projects but never created one on your own … I hope this will help.
Bite-size pieces
It would be easy to jump ahead and start coding up a solution, but I like to attack problems in bite-size pieces. Taking small, defined steps forward and locking them in provides a sense of forward momentum and a safer foundation when we reach the new areas and break something or take a wrong turn.
I’m not 100% how far this series is going to go, but I need this foundation for a side project so at a minimum we will
- Create an ASP.Net Core 2 app, without bothering with bootstrap
- Put it in source control
- Explore basic usage of Cosmos DB by writing some simple CRUD pages
- Apply the newest iteration of ASP.Net Authentication
- Expand to support multiple authentication methods
- Apply better patterns for Cosmos DB setup and usage
- Ensure forms are safe from Cross site request forgery
- …And maybe: Solid error handling, generic error pages, basic instrumentation, API token authentication, CI/CD, unit tests, and more
We will do this all without letting the standard templates steer us into using bootstrap, Entity Framework, “install all the things” authentication checkboxes, buttons that manually deploy completely unrepeatable local builds, or any other magic that would get in the way of learning how these things work.
Ready? Awesome, let’s go!
Task 1: Create the Solution
We’ll start with the ASP.Net Core Web Application with the API template (Create new project…). This includes the minimal set of nuget packages we need without creating piles of example and template files we’d have to go through and clean out. Also be sure to not choose an Authentication option. That magic is best left for temporary projects when you’re trying to decode the documentation, but don’t want to accidentally add 100 packages to your real system.
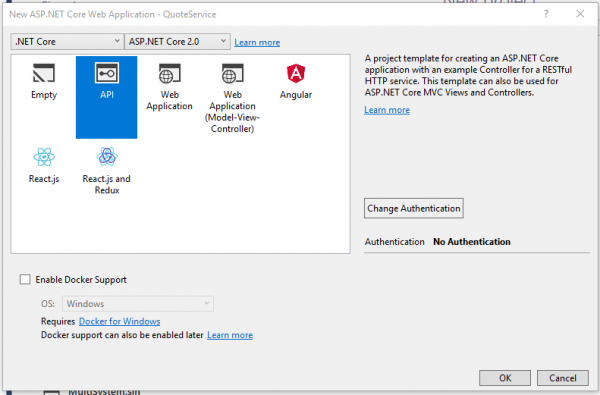
Creating an ASP.Net Core 2 Project
This template has minimal magic, we get a basic ASP.Net Core 2 website with a single Values API Controller.
Let’s lock in this first win by pressing F5 to run the site and verify we have a working API that returns the hard-coded sample values from ValuesController.Get():
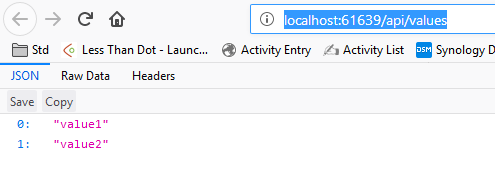
ASP.Net Core 2 – Default ValuesController Output
Good. It only took a few seconds to verify and now we can move on knowing it works and what port we’re working on.
The next step is moving from raw API output to HTML output.
Adding the First MVC Page
We started with an API project template, but unlike prior versions of ASP.Net it is pretty easy to start adding MVC capabilities.
Following the expected conventions, let’s add a “Controllers” folder to the project. Then we can use the right-click context menu from there to “Add New Item” and pick an ASP.Net Core Controller Class:
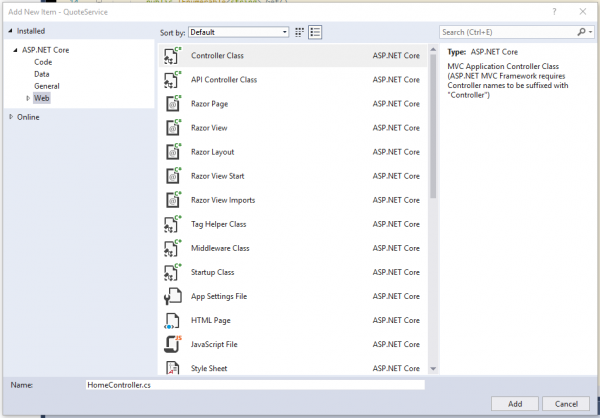
ASP.Net Core 2: Add New Item – Controller Class
Like earlier versions, a Controller Class is a standard C# class that inherits from Controller, so you also have the option of just creating a basic class and adding the “Controller” suffix and inheritance yourself, for a few less clicks.
The default for routing with this project is attribute routing rather than the global route registered in most earlier MVC versions. Add a [Route("")] attribute above the class declaration to route base level “/” paths to this controller.
SampleCosmosCore2App/Controllers/HomeController.cs
| C# | |
1 2 3 4 5 6 7 8 9 10 11 12 13 14 | // ... namespace SampleCosmosCore2App.Controllers { [Route("")] public class HomeController : Controller { public IActionResult Index() { return View(); } } } |
// ...

namespace SampleCosmosCore2App.Controllers
{
    [Route("")]
    public class HomeController : Controller
    {

        public IActionResult Index()
        {
            return View();
        }
    }
}
Next we’ll add a Layout.cshtml file that to serve as the general HTML layout for the site. Again we want to match the standard ASP.Net MVC conventions, so first create a top-level folder named Views, then create a folder under this named Shared, then finally right-click this folder to “Add View”, ensure you have Empty Model and no layout selected, with the name “Layout”
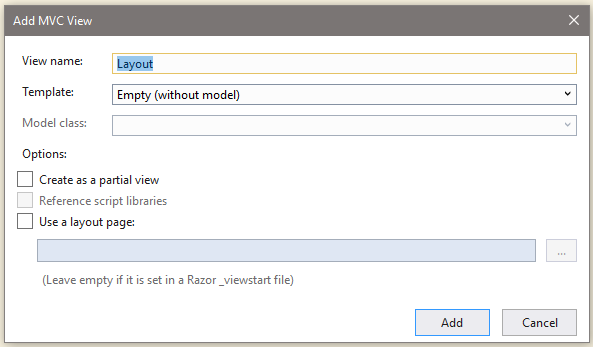
ASP.Net Core 2 – Add View Dialog

Once created, edit the Layout.cshtml file to look like this:
SampleCosmosCore2App/Views/_Shared/Layout.cshtml
| HTML | |
1 2 3 4 5 6 7 8 9 10 11 | <!DOCTYPE html> <html> <head> <meta name="viewport" content="width=device-width" /> <title>Layout</title> </head> <body> @RenderBody() </body> </html> |
<!DOCTYPE html><html> <head> <meta name="viewport" content="width=device-width" /> <title>Layout</title> </head> <body> @RenderBody() </body> </html>
Finally, we’ll create the first view for HomeController. Create a Home subfolder under Views, then right-click and “Add View” again. This time select “Layout.cshtml” as the layout, but continue to leave Model empty.
Here we go:
/SampleCosmosCore2App/Views/Home/Index.cshtml
| HTML | |
1 2 3 4 5 6 | @{
ViewData["Title"] = "Home";
Layout = "~/Views/_Shared/Layout.cshtml";
}
<h2>Home</h2> |
@{
    ViewData["Title"] = "Home";
    Layout = "~/Views/_Shared/Layout.cshtml";
}

<h2>Home</h2>
Time to lock in our winnings again before we move on. Hit F5 and visit the root URL (http://localhost:????/) to verify we have the first task completed successfully.
Excellent, time to move on.
Task 2: Set Up Source Control
The best way to lock in progress is to commit it to source control. This gives us a way to not only save our incremental progress, but also back out of experiments that go awry.
For this post, I’m using git with github as a remote repository.
Open up a terminal window (I prefer Powershell with the posh-git plugin), and type git init in the root folder of the solution:
Initializing a git repository
There are a number of files we don’t want to commit and share, such as binaries from the build, user-specific settings in Visual Studio, and so on. We also need to help future us install the right dependencies when we come back to this later. So let’s create a /gitignore for the first and README.md for the latter. I typically start this in the console (powershell again) out of habit:
| Text | |
1 2 | wget -O .gitignore https://raw.githubusercontent.com/dotnet/core/master/.gitignore echo "" > README.md |
wget -O .gitignore  https://raw.githubusercontent.com/dotnet/core/master/.gitignore
echo "" > README.md
One last file to consider is a license statement. You can use choosealicense.com to help pick one and providers like github are pretty smart about providing additional visibility when you use a standard one they recognize.
At this point, we’ll also add some minimal info to the README while it’s fresh in our minds. A good start is the name of the project and a section outlining the dependencies so far:
| Text | |
1 2 3 4 5 6 7 8 9 | # Overview Blah blah, amazing things... # Dependencies * Visual Studio 2017 * ASP.Net Core 2 * .Net Core 2 |
# OverviewBlah blah, amazing things...
Dependencies
- Visual Studio 2017
- ASP.Net Core 2
- .Net Core 2
Finally, we’ll save all this with the first commit as a starting point. Visual Studio includes tooling for git, you can also use third party tools like gitkraken and smartgit, or you can stick to the command-line. I personally use posh-git, which I find to be better than the basic git command-line.
So that we don’t get too side-tracked, here’s how I’m going to commit this via command-line:
| Text | |
1 2 | git add -A git commit -m "Initial Commit" -m "ASP.Net Core 2 project with working MVC endpoint, README, and .gitignore" |
git add -A
git commit -m "Initial Commit" -m "ASP.Net Core 2 project with working MVC endpoint, README, and .gitignore"
Third Party Git Repo: Github
First, log into the git provider (in my case github) and create a repository. Once this is done, the service should give you instructions to connect and push your changes to that remote repository. They’ll look something like this:
| Text | |
1 2 | git remote add origin git@your-provider.com:your-username/your-repo-name.git git push -u origin master |
git remote add origin git@your-provider.com:your-username/your-repo-name.git
git push -u origin master
origin as the remote name, but it is a common convention that many providers build some assumptions around in their interface.
We’re now safe from losing all your work on your local machine, task 2 is complete successfully!
Task 3: Wire in Cosmos DB
Now it’s time to figure out how to do some basic tasks with Cosmos DB. This will require obvious things like queries and inserting data, as well as less obvious tasks like figuring out where to record secrets for the local development environment, setting up a local emulator, and more (another reason we’re doing this in bite-size pieces, there’s always surprises).
Download the emulator here: Cosmos DB Emulator
Next, I’m going to insist on creating a new project to house my database logic. In some cases this is too early to make architectural decisions like this, but I know from vast personal experience that I have never, ever enjoyed the experience of having this type of logic mixed into my ASP.Net project.
This new project is going to be called “SampleCosmosCore2App.Core”. If you haven’t added many projects to solutions, the usual procedure is:
- Right click the Solution and select “Add”, “New Project”
- Select “Class Library (.NET Core)”
- Give it a name and continue
Then reference the new project from the ASP.Net one:
- Right click the MVC project
- Select “Add”, “Reference” and check the box next to the “*.Core” project
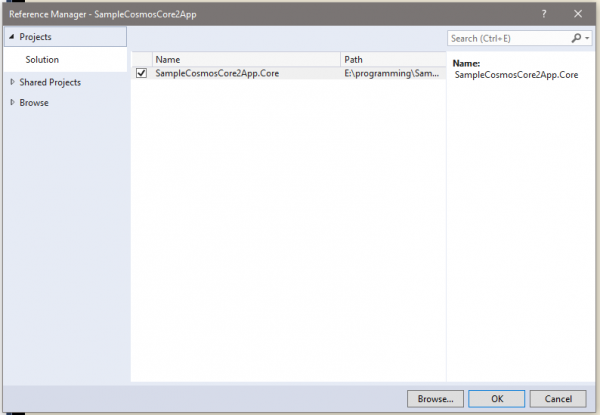
ASP/.Net Core – Adding Project Reference
At this point, I don’t know what I don’t know, so my aim is simplistic, working logic. Once I get that far, I can start looking into repeatable and more production-ready patterns with the context of knowing some basics from my first pass.
I’m going to work with a data class named Sample, so I’ll create a Sample.cs class file and a Persistence.cs class file. The first will be a serializable document, the second the class that handles reading and writing that document to Cosmos DB.
Add the Microsoft.Azure.DocumentDB.Core nuget package to your “*.Core” project:

Add Microsoft.Azure.DocumentDB.Core package
Right click the “Dependencies” folder of the “*.Core” project and search for it, or use the Package Manager Console and type Install-Package Microsoft.Azure.DocumentDB.Core SampleCosmosCore2App.Core (use your project name, not mine).
Next, in the SamplePersistence object, we’ll add functions to setup the Sample DocumentCollection in Cosmos and perform common CRUD operations for documents in that collection:
SampleCosmosCore2App.Core/Persistence.cs
| C# | |
1 2 3 4 5 6 7 8 9 10 11 12 13 14 15 16 17 18 19 20 21 22 23 24 | // ... public Persistence(Uri endpointUri, string primaryKey) { _databaseId = "QuoteServiceDB"; _endpointUri = endpointUri; _primaryKey = primaryKey; } public async Task EnsureSetupAsync() { if (_client == null) { _client = new DocumentClient(_endpointUri, _primaryKey); } await _client.CreateDatabaseIfNotExistsAsync(new Database { Id = _databaseId }); var databaseUri = UriFactory.CreateDatabaseUri(_databaseId); // Samples await _client.CreateDocumentCollectionIfNotExistsAsync(databaseUri, new DocumentCollection() { Id = "SamplesCollection" }); } // ... |
// ...

public Persistence(Uri endpointUri, string primaryKey)
{
    _databaseId = "QuoteServiceDB";
    _endpointUri = endpointUri;
    _primaryKey = primaryKey;
}

public async Task EnsureSetupAsync()
{
    if (_client == null)
    {
        _client = new DocumentClient(_endpointUri, _primaryKey);
    }

    await _client.CreateDatabaseIfNotExistsAsync(new Database { Id = _databaseId });
    var databaseUri = UriFactory.CreateDatabaseUri(_databaseId);

    // Samples
    await _client.CreateDocumentCollectionIfNotExistsAsync(databaseUri, new DocumentCollection() { Id = "SamplesCollection" });
}

// ...
And a data object like so:
SampleCosmosCore2App.Core/Sample.cs
| C# | |
1 2 3 4 5 6 7 | public class Sample { [JsonProperty(PropertyName = "id")] public string Id { get; set; } public string Content { get; set; } } |
public class Sample
{
    [JsonProperty(PropertyName = "id")]
    public string Id { get; set; }

    public string Content { get; set; }
}
Each document in Cosmos DB will have an id property and, by default, it will generate that id value for us when we add a new document.
JsonProperty above: Cosmos DB serializes with the same case you use in your call, by default. We want this Id to bind to the one Cosmos DB will create on the document, so we tell it to serialize/deserialize Id as id. Alternatively, you can override the default casing with JsonSerializerSettings via the DocumentClient constructorto set JSON.Net’s NamingStrategy for the SDK client.
Returning to the Persistence class, we’ll add some basic CRUD operations to Save, Get, and Get All:
SampleCosmosCore2App.Core/Persistence.cs
| C# | |
1 2 3 4 5 6 7 8 9 10 11 12 13 14 15 16 17 18 19 20 21 22 23 24 25 26 27 28 29 30 31 32 33 34 35 36 37 38 39 40 | // ... public async Task SaveSampleAsync(Sample sample) { await EnsureSetupAsync(); var documentCollectionUri = UriFactory.CreateDocumentCollectionUri(_databaseId, "SamplesCollection"); await _client.UpsertDocumentAsync(documentCollectionUri, sample); } public async Task<Sample> GetSampleAsync(string Id) { await EnsureSetupAsync(); var documentUri = UriFactory.CreateDocumentUri(_databaseId, "SamplesCollection", Id); var result = await _client.ReadDocumentAsync<Sample>(documentUri); return result.Document; } public async Task<List<Sample>> GetSamplesAsync() { await EnsureSetupAsync(); var documentCollectionUri = UriFactory.CreateDocumentCollectionUri(_databaseId, "SamplesCollection"); // build the query var feedOptions = new FeedOptions() { MaxItemCount = -1 }; var query = _client.CreateDocumentQuery<Sample>(documentCollectionUri, "SELECT * FROM Sample", feedOptions); var queryAll = query.AsDocumentQuery(); // combine the results var results = new List<Sample>(); while (queryAll.HasMoreResults) { results.AddRange(await queryAll.ExecuteNextAsync<Sample>()); } return results; } // ... |
// ...

public async Task SaveSampleAsync(Sample sample)
{
    await EnsureSetupAsync();

    var documentCollectionUri = UriFactory.CreateDocumentCollectionUri(_databaseId, "SamplesCollection");
    await _client.UpsertDocumentAsync(documentCollectionUri, sample);
}

public async Task<Sample> GetSampleAsync(string Id)
{
    await EnsureSetupAsync();

    var documentUri = UriFactory.CreateDocumentUri(_databaseId, "SamplesCollection", Id);
    var result = await _client.ReadDocumentAsync<Sample>(documentUri);
    return result.Document;
}

public async Task<List<Sample>> GetSamplesAsync()
{
    await EnsureSetupAsync();

    var documentCollectionUri = UriFactory.CreateDocumentCollectionUri(_databaseId, "SamplesCollection");

    // build the query
    var feedOptions = new FeedOptions() { MaxItemCount = -1 };
    var query = _client.CreateDocumentQuery<Sample>(documentCollectionUri, "SELECT * FROM Sample", feedOptions);
    var queryAll = query.AsDocumentQuery();

    // combine the results
    var results = new List<Sample>();
    while (queryAll.HasMoreResults) {
        results.AddRange(await queryAll.ExecuteNextAsync<Sample>());
    }

    return results;
}

// ...
This provides all the persistence methods we need, now we can move up to the ASP.Net project and add in the Controller actions and views. Again, I’m in experimental mode, so I’m making sure the database and DocumentCollection exist on every call, but later I’ll find a better pattern for this.
Dependency Injection is built into ASP.Net Core, so to make an instance of this new Persistence class available to Controllers we can register it in Startup.cs like so:
SampleCosmosCore2App/Startup.cs
| C# | |
1 2 3 4 5 6 | services.AddScoped<Persistence>((s) => { return new Persistence( new Uri(Configuration["CosmosDB:URL"]), Configuration["CosmosDB:PrimaryKey"]); }); |
services.AddScoped<Persistence>((s) =>
{
    return new Persistence(
        new Uri(Configuration["CosmosDB:URL"]),
                Configuration["CosmosDB:PrimaryKey"]);
});Then in our local development config we’ll add the emulator URL and Primary Key:
SampleCosmosCore2App/appsettings.Development.json
| Javascript | |
1 2 3 4 5 6 7 8 | { // ... "CosmosDB": { "URL": "https://localhost:8081", "PrimaryKey": "C2y6yDjf5/R+ob0N8A7Cgv30VRDJIWEHLM+4QDU5DE2nQ9nDuVTqobD4b8mGGyPMbIZnqyMsEcaGQy67XIw/Jw==" } } |
{
   // ...

  "CosmosDB": {
    "URL": "https://localhost:8081",
    "PrimaryKey": "C2y6yDjf5/R+ob0N8A7Cgv30VRDJIWEHLM+4QDU5DE2nQ9nDuVTqobD4b8mGGyPMbIZnqyMsEcaGQy67XIw/Jw=="
  }
}
I’ve used a Scoped service so that a fresh Persistence object will be created for each Request. This will result in a fresh DocumentClient created on each request further down the stack, which is a safe starting point when I’m working with something new that I haven’t dug too deep on yet.
Next, we need Controller Actions to show the list of Sample values, Create a new one, Edit one, and Post edited contents to be saved. To keep this simple, we can wire these to two Views: a list of all of the items and an editable display of one.
SampleCosmosCore2App/Controllers/HomeController
| C# | |
1 2 3 4 5 6 7 8 9 10 11 12 13 14 15 16 17 18 19 20 21 22 23 24 25 26 27 28 29 30 31 32 33 34 35 36 37 38 | [Route("")] public class HomeController : Controller { private Persistence _persistence; public HomeController(Persistence persistence) { _persistence = persistence; } [HttpGet()] public async Task<IActionResult> IndexAsync() { var samples = await _persistence.GetSamplesAsync(); return View("Index", samples); } [HttpGet("Create")] public IActionResult Create() { var sample = new Sample() { }; return View("Get", sample); } [HttpGet("{id}")] public async Task<IActionResult> GetAsync(string id) { var sample = await _persistence.GetSampleAsync(id); return View("Get", sample); } [HttpPost()] public async Task<IActionResult> PostAsync([FromForm] Sample sample) { await _persistence.SaveSampleAsync(sample); return RedirectToAction("IndexAsync"); } } |
[Route("")]
public class HomeController : Controller
{
    private Persistence _persistence;

    public HomeController(Persistence persistence)
    {
        _persistence = persistence;
    }

    [HttpGet()]
    public async Task<IActionResult> IndexAsync()
    {
        var samples = await _persistence.GetSamplesAsync();
        return View("Index", samples);
    }

    [HttpGet("Create")]
    public IActionResult Create()
    {
        var sample = new Sample() { };
        return View("Get", sample);
    }

    [HttpGet("{id}")]
    public async Task<IActionResult> GetAsync(string id)
    {
        var sample = await _persistence.GetSampleAsync(id);
        return View("Get", sample);
    }

    [HttpPost()]
    public async Task<IActionResult> PostAsync([FromForm] Sample sample)
    {
        await _persistence.SaveSampleAsync(sample);
        return RedirectToAction("IndexAsync");
    }
}
Here are the notable changes:
- We’ve added
Persistenceas a necessary dependency in the Controller - We’ve switched all Actions to
asyncto support thePersistencemethods IndexAsyncgets the list ofSamples and displays them in the “Index” viewCreateconstructs a newSampleand displays it in the editable “Get” viewGetAsyncdoes the same thing, but loads theSamplefromPersistencefor the passed{id}in the routePostAsyncaccepts a modifiedSample, saves it viaPersistence, and redirects back to showing the whole list
You can easily generate a scaffolded view for these by right-clicking in an Action above and selecting “New View”. Pick the List or Edit templates as a starting point, with the model class set to the Sample object.
Because we started from a blank slate, these templates won’t work directly out of the box (stackoverflow). Add a file _ViewImports.cshtml to register the tag helpers:
SampleCosmosCore2App/Views/_ViewImports.cshtml
| C# | |
1 | @addTagHelper *, Microsoft.AspNetCore.Mvc.TagHelpers |
@addTagHelper *, Microsoft.AspNetCore.Mvc.TagHelpers
The scaffolded views also assume we’re using bootstrap and include 2-3x more HTML than we actually need, so we can trim them down quite a bit:
SampleCosmosCore2App/Views/Get.cshtml
| HTML | |
1 2 3 4 5 6 7 8 9 10 11 12 13 14 15 16 | @model SampleCosmosCore2App.Core.Sample
@{
ViewData["Title"] = "GetAsync";
Layout = "~/Views/_Shared/Layout.cshtml";
}
<h2>Sample</h2>
<form asp-action="PostAsync">
Id: @Model.Id <input asp-for="Id" type="hidden" /><br />
Content: <input asp-for="Content" /><br />
<input type="submit" value="Save" />
</form>
<a asp-action="IndexAsync">Back to List</a> |
@model SampleCosmosCore2App.Core.Sample@{ ViewData["Title"] = "GetAsync"; Layout = "~/Views/_Shared/Layout.cshtml"; }
<h2>Sample</h2>
<form asp-action="PostAsync"> Id: @Model.Id <input asp-for="Id" type="hidden" /><br /> Content: <input asp-for="Content" /><br /> <input type="submit" value="Save" /> </form>
<a asp-action="IndexAsync">Back to List</a>
SampleCosmosCore2App/Views/Index.cshtml
| C# | |
1 2 3 4 5 6 7 8 9 10 11 12 13 14 15 16 17 18 19 20 21 22 23 24 25 26 27 28 29 30 31 32 33 34 35 36 37 38 39 40 41 | @model IEnumerable<SampleCosmosCore2App.Core.Sample> @{ ViewData["Title"] = "View"; Layout = "~/Views/_Shared/Layout.cshtml"; } <h2>View</h2> <p> <a asp-action="Create">Create New</a> </p> <table class="table"> <thead> <tr> <th> @Html.DisplayNameFor(model => model.Id) </th> <th> @Html.DisplayNameFor(model => model.Content) </th> <th></th> </tr> </thead> <tbody> @foreach (var item in Model) { <tr> <td> @Html.DisplayFor(modelItem => item.Id) </td> <td> @Html.DisplayFor(modelItem => item.Content) </td> <td> @Html.ActionLink("Edit", "GetAsync", new { id=item.Id }) </td> </tr> } </tbody> </table> |
@model IEnumerable<SampleCosmosCore2App.Core.Sample>@{ ViewData["Title"] = "View"; Layout = "~/Views/_Shared/Layout.cshtml"; }
<h2>View</h2>
<p> <a asp-action="Create">Create New</a> </p> <table class="table"> <thead> <tr> <th> @Html.DisplayNameFor(model => model.Id) </th> <th> @Html.DisplayNameFor(model => model.Content) </th> <th></th> </tr> </thead> <tbody> @foreach (var item in Model) { <tr> <td> @Html.DisplayFor(modelItem => item.Id) </td> <td> @Html.DisplayFor(modelItem => item.Content) </td> <td> @Html.ActionLink("Edit", "GetAsync", new { id=item.Id }) </td> </tr> } </tbody> </table>
And now we have a very simple CRUD interface:
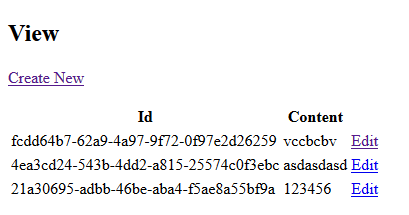
ASP.Net Core 2 – Basic CRUD Interface to Cosmos DB
Add and edit some items to make sure it’s working, then commit the changes to lock it in. We now have a complete vertical slice from the UI down to the Cosmos DB store!
Looking Forward
Almost none of this code will likely live to still be in the final app, but we’ve completed several steps forward:
- We can serve up HTML and API content
- We’ve got some basic CRUD logic with Cosmos DB
- We have source control and a basic README
Next we’ll add general login and registration capabilities. This will continue the foundation by helping us figure out Authentication for the system, but also add some real data needs to our Cosmos DB so we can start identifying a good pattern for that persistence logic.