My personal website is a static site: 100% HTML, JS, and CSS files with no server-side processing. I have custom code that pulls data from a variety of sources and builds updated versions of the files from templates, which are then deployed to the host. I do this to move the CPU latency of building the pages to my time, instead of charging it to visitors on each page hit. While I have a host, a strategy like this means I could also choose to host for free via github or similar services.
So there’s a great benefit to the reader and our wallet, but no server-side execution makes things like contact forms trickier. Luckily, Azure Functions or AWS Lambda can be used as a webhook to receive the form post and process it, costing nothing near nothing to use (AWS and Azure both offer a free tier for 1M requests/month and 400,000 GB-seconds of compute time).
So we swap out a hosted server at $x/month for free static page hosting and free contact form (and similar services), it just takes a little different type of work then building the standard PHP, ASP.Net, etc site.
Creating the Azure Function
First up, let’s build out an Azure Function to accept a form post and convert it to an email.
Setting up the function
From the Azure Dashboard, create a new “Azure Function App”.
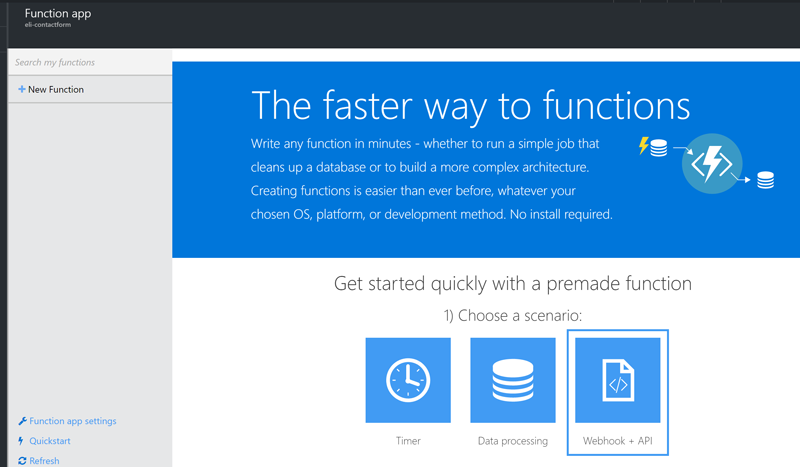
Azure Function App – Getting Started
The Azure Portal offers us a few options to get started quickly. Pick the one on the right “Webhook + API” to get a function set up with the trigger and output we need out of the box.
The trigger for the Azure Function is the Webhook endpoint:
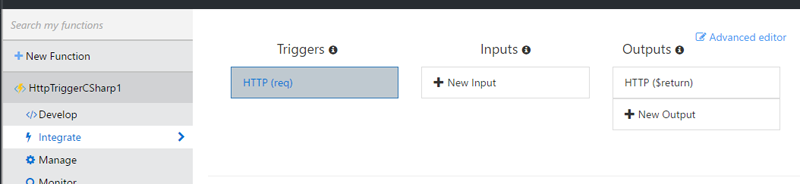
Azure Function – Webhook Trigger
We can customize this to listen only to the /contact route and POST messages:
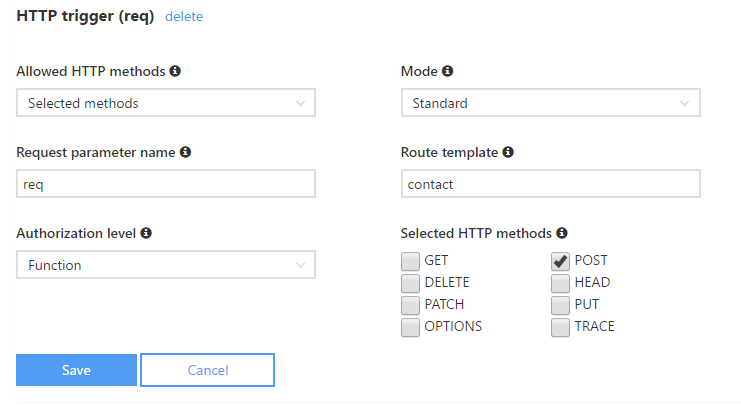
Azure Function – Webhook Trigger Details
There are other details we could configure, so as you do this you might start getting all kinds of other ideas (remember, 1M requests/month and 400,000 GB-seconds of compute time for FREE!).
We don’t have an input for this Azure Function, and the return value is simply the HTTP Response we’ll return form the trigger, so no further configuration to do:
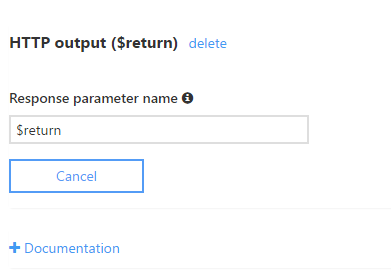
Azure Function – Return Value
We now have the “hello world” version of a webhook, let’s add more code.
Coding the Contact Email and Response
The function starts with some generated code that matches the variable names in the Trigger and Output (I picked C#, JavaScript is also an option), attempts to pull a value out of the querystring, and returns a “Hello” response:
| C# | |
1 2 3 4 5 6 7 8 9 10 | using System.Net; public static async Task<HttpResponseMessage> Run(HttpRequestMessage req, TraceWriter log) { // ... sample code we don't need that pulls name from querystring ... return name == null ? req.CreateResponse(HttpStatusCode.BadRequest, "Please pass a name on the query string or in the request body") : req.CreateResponse(HttpStatusCode.OK, "Hello " + name); } |
using System.Net;

public static async Task<HttpResponseMessage> Run(HttpRequestMessage req, TraceWriter log)
{
    // ... sample code we don't need that pulls name from querystring ...

    return name == null
        ? req.CreateResponse(HttpStatusCode.BadRequest, "Please pass a name on the query string or in the request body")
        : req.CreateResponse(HttpStatusCode.OK, "Hello " + name);
}
Before we start in on the email code, let’s start by not putting the secrets right in the code. Functions have a built in method to manage secrets, but they’re not terribly easy to find. Click the “Function app settings” menu option at the bottom left to get to this screen:
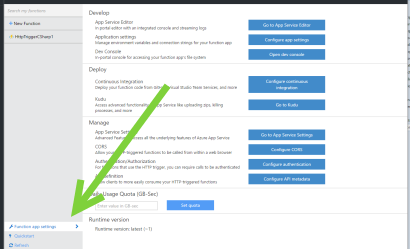
Finding the App Settings, Step 1
Then click the “App Settings” button:
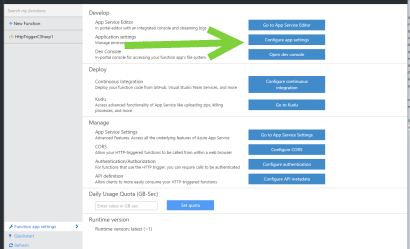
Finding the App Settings, Step 2
This will open another blade to the right. One of the sections is the “App settings” section. You can enter AppSettings key/value configurations here that will be available to your function code. In my case, I’m going to add in all of my SMTP settings so I don’t have them stored in the code when I later hook this to a git repository.
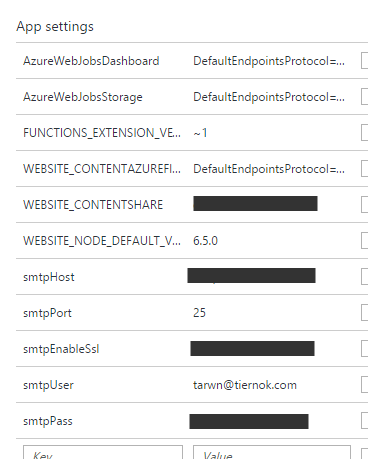
Adding SMTP AppSettings
Now we can add some basic validation and some fairly standard “send an email” code. I’m accessing the stored secrets above via ConfigurationManager.AppSettings, as I would if you were writing a .Net application with an app.config.
| C# | |
1 2 3 4 5 6 7 8 9 10 11 12 13 14 15 16 17 18 19 20 21 22 23 24 25 26 27 28 29 30 31 32 33 34 35 36 37 38 39 40 41 42 43 44 45 46 47 48 49 50 51 52 53 54 | using System.Configuration; using System.Net; using System.Net.Mail; using System.Threading.Tasks; public static async Task<HttpResponseMessage> Run(HttpRequestMessage req, TraceWriter log) { log.Info("C# HTTP trigger function processed a request."); // 1: Get request body + validate required content is available var postData = await req.Content.ReadAsFormDataAsync(); var missingFields = new List<string>(); if(postData["fromEmail"] == null) missingFields.Add("fromEmail"); if(postData["message"] == null) missingFields.Add("message"); if(missingFields.Any()) { var missingFieldsSummary = String.Join(", ", missingFields); return req.CreateResponse(HttpStatusCode.BadRequest, $"Missing field(s): {missingFieldsSummary}"); } // 2: Site settings var smtpHost = ConfigurationManager.AppSettings["smtpHost"]; var smtpPort = Convert.ToInt32(ConfigurationManager.AppSettings["smtpPort"]); var smtpEnableSsl = Boolean.Parse(ConfigurationManager.AppSettings["smtpEnableSsl"]); var smtpUser = ConfigurationManager.AppSettings["smtpUser"]; var smtpPass = ConfigurationManager.AppSettings["smtpPass"]; var toEmail = ConfigurationManager.AppSettings["toEmail"]; // 3: Build + Send the email MailMessage mailObj = new MailMessage(postData["fromEmail"], toEmail, "Site Contact Form", postData["message"]); SmtpClient client = new SmtpClient(); client.Host = smtpHost; client.Port = smtpPort; client.EnableSsl = smtpEnableSsl; client.DeliveryMethod = SmtpDeliveryMethod.Network; client.UseDefaultCredentials = false; client.Credentials = new System.Net.NetworkCredential(smtpUser, smtpPass); try { client.Send(mailObj); return req.CreateResponse(HttpStatusCode.OK, "Thanks!"); } catch (Exception ex) { return req.CreateResponse(HttpStatusCode.InternalServerError, new { status = false, message = $"Email has not been sent: {ex.GetType()}" }); } } |
using System.Configuration;
using System.Net;
using System.Net.Mail;
using System.Threading.Tasks;

public static async Task<HttpResponseMessage> Run(HttpRequestMessage req, TraceWriter log)
{
    log.Info("C# HTTP trigger function processed a request.");

    // 1: Get request body + validate required content is available
    var postData = await req.Content.ReadAsFormDataAsync();
    var missingFields = new List<string>();
    if(postData["fromEmail"] == null)
        missingFields.Add("fromEmail");
    if(postData["message"] == null)
        missingFields.Add("message");

    if(missingFields.Any())
    {
        var missingFieldsSummary = String.Join(", ", missingFields);
        return req.CreateResponse(HttpStatusCode.BadRequest, $"Missing field(s): {missingFieldsSummary}");
    }

    // 2: Site settings
    var smtpHost = ConfigurationManager.AppSettings["smtpHost"];
    var smtpPort = Convert.ToInt32(ConfigurationManager.AppSettings["smtpPort"]);
    var smtpEnableSsl = Boolean.Parse(ConfigurationManager.AppSettings["smtpEnableSsl"]);
    var smtpUser = ConfigurationManager.AppSettings["smtpUser"];
    var smtpPass = ConfigurationManager.AppSettings["smtpPass"];
    var toEmail = ConfigurationManager.AppSettings["toEmail"];

    // 3: Build + Send the email
    MailMessage mailObj = new MailMessage(postData["fromEmail"], toEmail, "Site Contact Form", postData["message"]);
    SmtpClient client = new SmtpClient();
    client.Host = smtpHost;
    client.Port = smtpPort;
    client.EnableSsl = smtpEnableSsl;
    client.DeliveryMethod = SmtpDeliveryMethod.Network;
    client.UseDefaultCredentials = false;
    client.Credentials = new System.Net.NetworkCredential(smtpUser, smtpPass);

    try
    {
        client.Send(mailObj);
        return req.CreateResponse(HttpStatusCode.OK, "Thanks!");
    }
    catch (Exception ex)
    {
        return req.CreateResponse(HttpStatusCode.InternalServerError, new {
            status = false,
            message = $"Email has not been sent: {ex.GetType()}"
        });
    }
}
With the code in place, we can use a tool like Postman to fire off some test POSTs and verify all the pieces are connected.
Don’t grab the URL above your code screen yet, it probably has an Administrative key coded into it. Open the “Keys” panel from the button (#1 below) in the top right and select the “default” key in the “Function Keys” list. When you do this, it will update the Function Url (#3) above the code panel to include this key instead of one of the Admin keys. As a final step, click the “Logs” (#2) button to open the log so you can see compile and run logs when it builds or is triggered. Now copy the Function URL (#3) so we can paste it into Postman to start testing.

Azure Functions – Key, Logs, and URL
In a new Postman request, enter the URL at the top, select “Post” as the method, and add in key/value pairs for the fromEmail and the message. Of course we expect this to fail the first time:
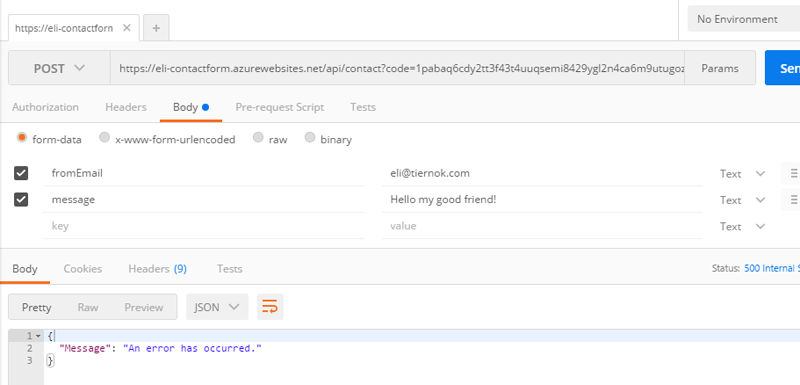
Azure Function – First Call Failed
Fixing the code then nets us:

Azure Function – Second Call Failed
Because my code is expecting urlencoded form data and wasn’t able to parse any from the body. Once we switch that, we get:
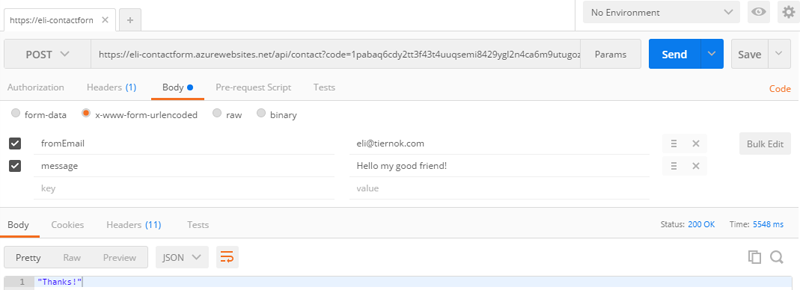
Azure Function – Success
Success!
Building the HTML form
Now we just need to switch from Postman to using an HTML form. Here’s a quick sample:
| C# | |
1 2 3 4 5 6 7 8 9 10 11 12 13 14 15 16 17 18 19 20 21 22 23 24 25 26 27 28 29 30 31 32 33 34 35 36 37 38 39 40 41 42 | <h1>Contact Form</h1> Send me a message! (Congratulations for finding this, it's not an official part of the site!) <div id="contactForm"> Your Email: <input type="text" name="fromEmail" /><br /> Message: <br /> <textarea cols="60" rows="4" name="message"></textarea><br /> <input type="submit" value="Send!" /> </div> <script src="https://code.jquery.com/jquery-3.1.1.min.js"></script> <script type="text/javascript"> var url = "https://eli-contactform.azurewebsites.net/api/contact?code=1pabaq6cdy2tt3f43t4uuqsemi8429ygl2n4ca6m9utugoz2gldiw15i5t61ew3pzzb7n60mb1emi"; $("form").on('submit', function (event) { event.preventDefault(); // grab contact form data var data = $(this).serialize(); // hide prior errors, disable inputs while we're submitting $("#contactFormError").hide(); $("#contactForm input").prop('disabled', true); // back in my day, we had to AJAX uphill both ways, in the snow, through cross-iframe scripts $.ajax({ type: "POST", url: url, data: data, dataType: "text", headers: {'Content-Type': 'application/x-www-form-urlencoded'}, success: function (respData) { // Yay, success!! $("#contactForm").html("<div style='padding: 5em 1em; text-align: center; color: #008800'>" + respData + "</div>"); }, error: function (jqXHR) { // Boo, error... $("#contactFormError").html("<div style='padding: 1em; text-align: center; color: #660000'>Sorry, an error occurred: " + jqXHR.responseText + "</div>"); $("#contactFormError").show(); $("#contactForm input").prop('disabled', false); } }); }); </script> |
<h1>Contact Form</h1>
Send me a message! (Congratulations for finding this, it's not an official part of the site!)
<div id="contactForm">
    Your Email: <input type="text" name="fromEmail" /><br />
    Message: <br />
    <textarea cols="60" rows="4" name="message"></textarea><br />
    <input type="submit" value="Send!" />
</div>

<script src="https://code.jquery.com/jquery-3.1.1.min.js"></script>
<script type="text/javascript">
    var url = "https://eli-contactform.azurewebsites.net/api/contact?code=1pabaq6cdy2tt3f43t4uuqsemi8429ygl2n4ca6m9utugoz2gldiw15i5t61ew3pzzb7n60mb1emi";
    $("form").on('submit', function (event) {
        event.preventDefault();

        // grab contact form data
        var data = $(this).serialize();

        // hide prior errors, disable inputs while we're submitting
        $("#contactFormError").hide();
        $("#contactForm input").prop('disabled', true);

        // back in my day, we had to AJAX uphill both ways, in the snow, through cross-iframe scripts
        $.ajax({
            type: "POST",
            url: url,
            data: data,
            dataType: "text",
            headers: {'Content-Type': 'application/x-www-form-urlencoded'},
            success: function (respData) {
                // Yay, success!!
                $("#contactForm").html("<div style='padding: 5em 1em; text-align: center; color: #008800'>" + respData + "</div>");
            },
            error: function (jqXHR) {
                // Boo, error...
                $("#contactFormError").html("<div style='padding: 1em; text-align: center; color: #660000'>Sorry, an error occurred: " + jqXHR.responseText + "</div>");
                $("#contactFormError").show();
                $("#contactForm input").prop('disabled', false);
            }
        });
    });
</script>
I use jQuery to post the form content because the Azure Function isn’t going to return a pretty HTML page. This way I can capture the output and use jQuery to tel the user whether it was successful or not.
There was one more catch the first time I tried this. Because I’m posting from my a page from my personal page to a domain in Azure, the calls initially fails with a Cross-Origin error. To enable Cross-Origin calls from your domain, go back to the Azure Functions interface in the App Settings section and open the CORS page:
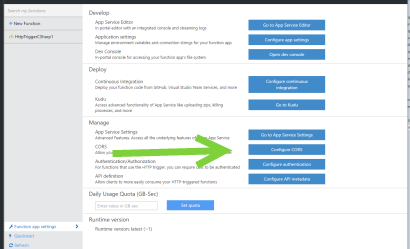
Azure Function – CORS Config
This will open the list of domains allowed to make Cross-Origin calls (which will result in the necessary Cross-Origin-Access header being sent back so your browser will trust the content). Add your domain, save, and your jQuery calls should now work just fine.
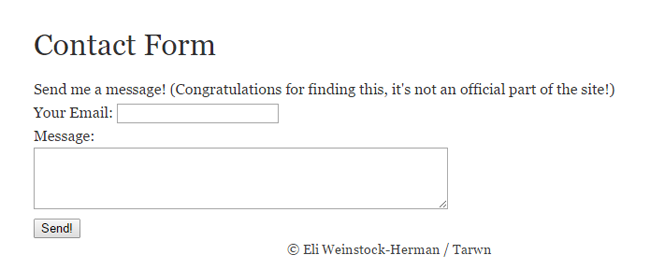
Contact Form
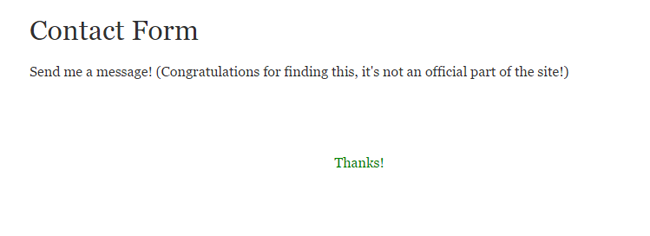
Contact Form Success!!
And there we go, successful contact emails on the static page.
Final Steps
Besides making a nicer user experience than the one I hacked together there, one last step you should also take is to enter in a value for the maximum daily usage quota just to ensure no one finds your form and tries to DOS your credit card.
So there we go, a contact form for a static website that should run absolutely free. This is easily extended to other features when you take into account that you could also be dropping messages in a queue, saving to blobs, etc and then using an AJAX GET call to a webhook like this to get that stored content (basically a free, trigger-based API service). There’s all kinds of options you can fit inside the free level of these services that frees you from having to pay for a full web host.