The examples I'm going to share are projects that use plain SQL and Dapper (lightweight ORM) to talk to their databases. There is no pre-built mechanism for migrating changes.
Don't let this scare you away.
Database Migrations Should Be Easy
Regardless of whether we're using pre-packaged frameworks or not, migrations should be easy, with rock solid consistency.
Here are my goals for database migrations:
- Migrations are plain SQL and applied consistently
- Transparent 2nd dev experience - pull latest commits and run the app, no extra steps
- Let me throw away databases, point the app at an empty database and it's caught up to present
- Real integration testing no global records, cross-talk b/w tests, or flaky behavior
- Human-free delivery - designed to run in a CD pipeline for non-local environments
- No
IF EXISTS ...behavior - that's a sign we don't really know what state our DB is in
When it's time to make a change, it's 2-4 steps:
- I write the SQL script for the change
- If it's complex, I may wrap it temporarily in
BEGIN TRAN/ROLLBACKto test manually - If it adds a new table, I add a
DELETE * FROM ...to a global "reset" script - I run the app (which applies the changes for real)
That's it.
If I need system-defined values in the DB, they go in the SQL script in step 1 and are excluded from the delete in step 3.
Example: Add "ProductType" administration to sample app
Let's walk through an addition in a sample application (I'll link to the github repo), then we can come back to the underlying mechanisms.
Creating a Database Change
Here's an example of an early change to create my users and session table with a built-in "System" user:
/database/migrations/20200929-B-Users.sql
CREATE TABLE dbo.ProductType (
    Id int NOT NULL IDENTITY(1,1),
    DisplayName varchar(80) NOT NULL,
    UpdatedOn DateTime2(3) NOT NULL,
    UpdatedBy int NOT NULL,

    CONSTRAINT PK_ProductType PRIMARY KEY CLUSTERED (Id ASC),
    CONSTRAINT FK_ProductType_User FOREIGN KEY (UpdatedBy) REFERENCES dbo.[User](Id)
);
And the addition to the reset file:
/database/reset/0001-ResetDatabase.sql
-- ...
DELETE FROM dbo.ProductType;
-- ...
I save these two files and then run the application.
When the application starts in DEBUG, it automatically runs the database migration as part of the startup against my locally configured development database. If there is an error with my migration file, the migration fails and tells me the problem so I can fix it and try again.
Add a List endpoint, starting w/ Integration Tests
The first endpoint I'll add is the "list" endpoint to get and display the list of Product Types.
Here's how I intend for it to work:
- There will be a set of endpoints for all product queries and updates:
/api/fe/products/**/* - I have 3 layers:
- API: a thin layer with the outside world, includes Authn, Authr, exposing an API, and validating/translating between messy outside world input and my nice, well-defined business logic
- Services: the core of the system that does all the work (which will be almost nothing in this case)
- Persistence: a thin layer to the database that translates between objects and relational storage
The first step after adding my database tables is to drive a spike from the API down to the new table, using an integration test.
My integration test project is already configured with it's own database connection string and a base test fixture that runs the migrations automatically for me, so I can focus on adding the new test fixture.
{
  "ConnectionStrings": {
    "Database": "Data Source=.;Initial Catalog=ELA_Tests;persist security info=True;Integrated Security=SSPI"
  },
  "AutomaticUpgrade": true
}
My new test fixture needs to:
- Extend the base so it opts into the automatic migrations, data helpers, etc.
- Decide to clear the database once for the whole fixture or every test (I'll go extreme for this one)
- Call a new test data helper to inject some data into the database
- Verify my endpoint returns a response with that data as expected
I will only implement enough of the interfaces to instantiate the Controller, the Database.ProductTypes helper to directly insert test data to the DB, and the test itself.
[TestFixture]
public class ProductControllerTests : IntegrationTestsBase
{
    private ProductsController _controller;

    [SetUp]
    public void BeforeEachTest()
    {
        Database.ClearDatabase();
        var persistence = new DapperPersistence(Database.GetConnectionSettings());
        var service = new ProductService(persistence);
        _controller = new ProductsController(service)
        {
            ControllerContext = GetControllerContextForFrontEnd()
        };
    }

    [Test]
    public async Task GetTypesAsync_SomeTypes_ReturnsListSuccessfully()
    {
        var expectedTypes = new List<ProductTypeDTO>() {
            Database.ProductTypes.Add("Unit test A"),
            Database.ProductTypes.Add("Unit test B"),
            Database.ProductTypes.Add("Unit test C")
        };

        var response = await _controller.GetProductTypesAsync();

        response.Should().BeOfType<OkObjectResult>()
            .Which.Value.Should().BeEquivalentTo(expectedTypes);
    }
}
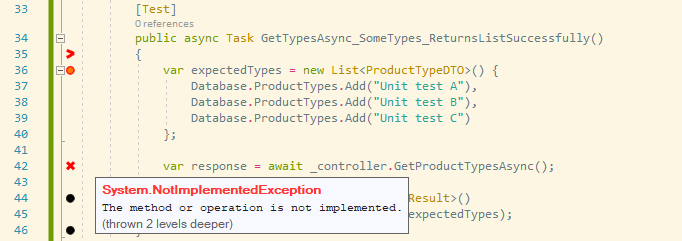
Next I run the test and it fails with a NotImplementedException from my service, success!

At this point I can continue to drive my logic down to the Persistence, which will be a basic SQL call w/ Dapper like this:
public async Task<List<ProductTypeDTO>> GetAllTypesAsync()
{
    var sql = @"
        SELECT Id,
                DisplayName,
                UpdatedBy,
                UpdatedOn
        FROM dbo.ProductType;
    ";
    using (var conn = GetConnection())
    {
        return (await conn.QueryAsync<ProductTypeDTO>(sql))
            .ToList();
    }
}
This confirms:
- ✔ My SQL migration works: I've run it 2 ways + queried the table 2 ways
- ✔ My logic to call down through to that new query works
- ✔ I can move on to the front-end and even if I have to change the shape of my endpoints, I have rails to work on

From here we would go on to build the front-end, add more endpoints, etc, but let's go look at how the migration works instead.
How it works
There are 4 key pieces to this process:
- A migration project/exe using DbUp
- A naming standard for migration files to ensure the order is consistent with the order we add them
- A standard location for the reset script
- Connecting the dots
The migration executable for this project is located here: github
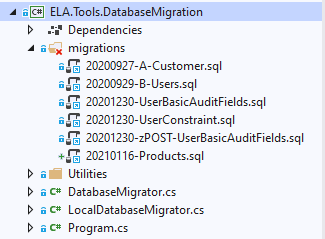
The Migration executable links to the folder of migrations, embedding them when it is built:

Run automatically when a developer Debugs
To run when a developer debugs, we add logic to the Startup.cs in the API project:
public void Configure(IApplicationBuilder app, IWebHostEnvironment env)
{
    // -- Development tasks
    if (env.IsDevelopment())
    {
        LocalDevelopmentTasks.MigrateDatabase(_configuration.GetConnectionString("Database"));
    }
which calls to the Migration project like so:
internal static void MigrateDatabase(string connectionString)
{
    LocalDatabaseMigrator.Execute(connectionString);
}
That LocalDatabaseMigrator wraps the same core logic our build process will use, but it adds additional console output and color formatting so we can see the detail errors in our console if our SQL has an error. If there is an error, no changes are applied and you can investigate.
Run automatically during integration tests
When a developer runs their integration tests, they shouldn't have to remember to update their database. Especially for those of us that use tools to automatically run tests constantly in the background without manually triggering them.
[OneTimeSetUp]
public void BaseSetup()
{
    if (_configuration.AutomaticUpgrade)
    {
        LocalDatabaseMigrator.Execute(Database.GetConnectionString());
    }
}
Very similar to the one we use to update when the user debugs the app. However, where the interactive startup checks if we're running in Development mode, this checks a setting from appsettings to see if it should perform the AutomaticUpgrade. This way, I can turn off the automatic upgrade and run the migration as a separate step in my build process before the integration tests, so I get one clear top-level message that the migration failed instead of hundreds or thousands of errors on individual test failures.
Run during deployment
The prior two examples have a project reference to the migration, but the project is an executable. The build process publishes two packages, the website and the migration tool. With these two artifacts, I can deploy the same version to as many environments as I need.
When we want to deploy against a real database, it's as simple as running:
- Windows:
ELA.Tools.DatabaseMigration.exe --ConnectionString "..." - Linux:
./ELA.Tools.DatabaseMigration --ConnectionString "..."
Oh yes, I have a blog post coming about running and deploying ASP.Net Core w/ SQL Server changes from Circle CI Linux images...stay tuned 🧐
Full Example Code and Multi-Tenant usage comments
The full project that this example code came from is available on github: github.com/tarwn/example-lob-app
This same pattern also works remarkably well for single-tenant databases in SaaS environments. The key difference is that you would need some code for Debug mode to query the list of tenant connection settings for the developer's tenant databases and feed them in, and something similar on the delivery pipeline.
For further affirmation, we use a similar pattern at Ledgex Systems built for multi-tenant environments. All developers have at least 2 tenants locally, we run 4 different multi-tenant systems with this pattern locally and in production, and have been performing numerous mid-day deploys/week with this pattern for 2 years.
If you're curious to learn more about how we got there, integrating it to build pipelines, or similar, let me know!

