Recently I've been working on a side-project using ASP.Net Core on MS Azure. Being a big proponent of automated deployment pipelines, one of the early steps I take in every project is to build in the deployment pipeline, since this is usually easiest before I build too far in the other direction.
What are blue/green deployments?
The pattern I'm using for this project is Blue/Green Deployment. The short version is
that we have two sites running at any time, one in Production and one in Staging, and
when we have new changes to deploy, we deploy those to Staging, do any testing we need
to do, warm up anything that needs warming, then swap them: sending the new changes
to Production and the old version to Staging.
A single website in App Services is quick to setup using git deploys, but if you're using an external build service/server (perhaps to include UI and/or smoke tests) then it can be a bit more involved to figure out which path to take. So here's one way to do it.
Setting it up
Assuming you already have an App Services website created, the first step is to add a
staging slot to the application:
First head into the Azure Portal for your existing website and add the slot:

Decision #1: When you deploy to your staging slot, do you want the deployment
to use different configurations beforre going to production? You have that option,
but regardless I'd suggest opting to copy the production slot settings at this
point even if you want to apply different settings in staging (less typing).
I won't walk you through the dialog, hopefully the steps are self-explanatory.
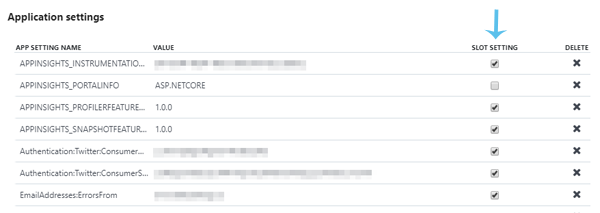
Verify your Application Settings
Both slots have their own Application Settings, but the default behavior is for the Application Settings to follow the deployment when you swap (which I this is backwards, but...).
So if you have Changeset #3 deployed in production and Changeset #4 deployed in
staging, when you swap #4 into production you want probably want it to now be
using the Application Settings you originall defined in production. So go to each
of the slot's Application Settings and ensure that you've checked Slot Setting
on each setting to pin it to the slot.
Great, now we're ready to automate it.
Scripting the Deployment + Swap
This is relatively easy if you install the Azure CLI on your build server or docker agent.
The CLI offers several deploy optins, but we'll be using the zip deploy method.
Other Deployment methods tend to rely on changes being pushed to a git repository, which means we don't know when the site has actually been deployed (thus making it hard to run external tests automatically). The zip deploy and older options, like using MS Deploy, are easier to script additional steps against.
Step 0: Produce a zip file
The first step is to produce a zip file of the code you wish to deploy to the server.
I'm working and ASP.Net Core site with front-end tasks in my package.json, so:
npm run install
npm run build
dotnet publish <PROJECT>
Then zip up the output, which is in <PROJECT>\bin\Release\netcoreapp2.0\publish
by default (for TeamCity you can specify a zip target in the archive settings
and it will zip the folder for you).
Step 1: Create a user
We could use the built-in publish settings or our own credentials, but that grants our build server a lot of unnecessary, extra power. Let's create a service user with limited access instead.
Using the Azure CLI, add a new Service Principal with limited scope (az ad sp create-for-rbac):
az ad sp create-for-rbac -n "{App Name}" -p "{password}" --role contributor \
           --scopes /subscriptions/{SubID}/resourceGroups/{ResourceGroup1}
For my purposes, I limited the principal to --scopes /subscriptions/{SubID} as sufficient,
to firewall it's access from my other Azure subscriptions.
Note: From here out, your user's name is actually the full http://{App Name}. I have opinions about AD, ask me some time...
To test the user we've created, login like so:
az login --service-principal -u http://{App Name} -p {password} --tenant {tenant id}And then test by running something like az group list.
Step 2: Create the Build script
I am using TeamCity build parameters for my variables (%thing% items below), but you could also
provide these as command-line parameters. Each of these should be available from the steps above
(including the Resource Group id, if you ran the az group list command).
call az login --service-principal -u %AzureCLI.Username% -p %AzureCLI.Password% --tenant %AzureCLI.Tenant%
call az webapp deployment source config-zip -n %AzureAppWebsiteName% -g %AzureAppResourceGroup% --src AuditLogApp.zip --slot staging
call az webapp start -n %AzureAppWebsiteName% -g %AzureAppResourceGroup% --slot staging
In english:
- Login
- Deploy the zip file to the
stagingslot - Start the
stagingslot (by default I keep it stopped)
With the running site in staging now, we can run API, UI, load, etc tests to ensure it's
working well.
(... extra steps here ...)
Once we're convinced the deployment is good, then we can swap the slots with an additional script:
call az login --service-principal -u %AzureCLI.Username% -p %AzureCLI.Password% --tenant %AzureCLI.Tenant%
call az webapp deployment slot swap -n %AzureAppWebsiteName% -g %AzureAppResourceGroup% --slot staging
call az webapp stop -n %AzureAppWebsiteName% -g %AzureAppResourceGroup% --slot staging
In english again:
- Login again for the next step
- Swap the deployment in
stagingtoproduction - Stop the
stagingslot (the old deployment)
And we're live!